Part 2: Plating and Spraying Color [Part 1 ]
One thing up front: the color of the car is not British Racing Green, though it's close. I decided to go with
Opalescent Dark Green, the very color that I liked the best long, long ago. I guess we all go back to our
 roots. The initial spray appears later in this page.
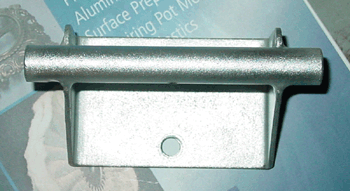
I got a Zinc and "Copy Cad" plating kit from Caswell Plating and set it up one moderately-not-cold weekend
in the garage. I carefully read the book, which was quite instructive though perhaps they could have stood the
skills of an editor. I set up the line of containers, donned my gloves, goggles, and protective clothing
and successfully plated a couple bonnet latch fittings. No sweat.
They key appears to be the preparation of the piece. The guidelines are simple: get it to straight, clean,
clear steel and you'll be OK. I blasted the pieces to the bare steel, since this was the proper prep
for a close to cadmium finish. The original cad was still on protected sections of the pieces, so I had to
make sure that I didn't breathe in any cadmium dust released during the blasting. I also used the 1:20
muriatic acid "pickle" to remove any residues. Electroplating took a bit longer than the manual suggested —
actually about twice as long, but I got good solid coverage. After the plating was done, I used a bronze wire
brush to make the metal gleam.
The end product looks shockingly like cadmium, I think in large part because the surface preparation with
blasting helps with the finish. I think only a very well trained eye could see the difference between "Copy Cad"
and the Real McCoy, and perhaps only then if pieces were next to each other.
I can tell that this plating process will take a long time. I am glad that I'll be sending out the bulk of the
plating to a professional. I can handle the small parts and nuts and bolts that I might want to plate.
Well, I announced before that the car was going to be British Racing Green, but I did give myself the option
of changing my mind until the paint can was safely in the garage. I did change my mind. And, besides, it turns
 out that 77RW was Opalescent Dark Green, too. I mentioned that I didn't like the color of a Opalescent Dark Green car I'd seen on the
Classic Jaguar website, but I noticed as well that photography of the color varied enormously. You can't get
a picture of what the color "really" is, since that is part of the charm of an opalescent/metallic paint.
The dark green seems to play with light especially well, and it appears nearly black in some light and
glimmeringly dark green in other light.
out that 77RW was Opalescent Dark Green, too. I mentioned that I didn't like the color of a Opalescent Dark Green car I'd seen on the
Classic Jaguar website, but I noticed as well that photography of the color varied enormously. You can't get
a picture of what the color "really" is, since that is part of the charm of an opalescent/metallic paint.
The dark green seems to play with light especially well, and it appears nearly black in some light and
glimmeringly dark green in other light.
Picking paint was not simply complicated by indecision. The paint codes that are available on the web are
lacking in currency. Sure, there are numbers to be found everywhere, but they are for the most part outdated and mostly
not even indexed or cross-referenced anymore. I worked with a PPG shop and a Dupont shop in Durham, North
Carolina, to get the codes straight. The Dupont shop took old codes I had found and contacted Dupont. They
subsequently scared up the original chips and mapped the current numbers.
I went over to the shop to look at the chip of Opalescent Dark Green but was astounded to see that the chip was
extremely dark. Dark, as in very close to black — and I put everything on hold again so that I could
verify the numbers somehow. The only difference that Dupont noticed in comparing the old and new chips was
a difference in size of the matallic flakes. The old chip had very small flakes; the newer chip had slightly
larger ones. The color itself was identical, for all practical purposes.
I took all of the numbers I had found for Opalescent Dark Green (about a half dozen of them from various
paint manufacturers) and went into the back room of the PPG place and watched the cross-reference database
at work. When the new Dupont number was entered, a PPG number that I had found came up. This was corraborating
evidence that I had a real Jaguar color. I would have walked out of the place with paint had it not been for the fact that the
color required some consultation with PPG. That couldn't be done immediately, so I left and called up the
diligent Dupont shop to order the paint. I was all set with paint in a couple of hours.
The paint has a basecoat of color that goes on thinned 1:1 and dries dull. Clearcoat goes on between one and six
hours after that. The clear brings out the metallic and sets the color bright. This process was almost identical
to the process for PPG that Bill McKenna described for his application of Opalescent Dark Blue.
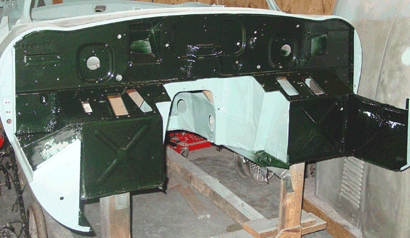
I masked and painted the front bulkhead (a scary vertical face!), and the paint and clearcoat was amazingly
resistant to dripping. The clearcoat was much thicker than the basecoat, but it held fast. The directions
suggest two or three sprays with a few minute "flash" between coats. I waited a little more than five minutes
between my clearcoats.
I have to touch up a section on the front right sill bulkhead panel where the basecoat bubbled (bad surface prep
I think), but everything looks great. I started with the front bulkhead so that I could get some practice
on a "low anxiety" part of the car (as if there is any such area). Spraying is an art. I hope I can master it
well enough for the areas that are most visible. One thing I can say is that the years have improved paint
technology. I remember spraying my old MG with enamel and having to rub out a huge mess. This paint
goes on much more easily, as far as I can tell, even with my very average spraying equipment.